Tuesday, July 12, 2016

Second layer planking

Marking out the run of wales and planking with pencil:

First couple of planks and wales done, taking care to keep the gun ports open

Bow. Sharp bends here, but the wood cooperates well.

Planks rise steeply at the stern

Stern transom planking


In 2007, I decided not to paint the bottom white as I had previously intended.
The problem with that is that I had already started some 2nd layer planking in mahogany.
Now I needed it to be walnut all the way to the keel, plus the keel needed improving if it was to be left natural

Ripping the walnut and the keel.
First keel piece in place. Solid walnut.

Bottom and keel done


Thursday, May 8, 2014

Corel Wasa hull correction and first layer planking

Well, shortly after the last update, the plans arrived.
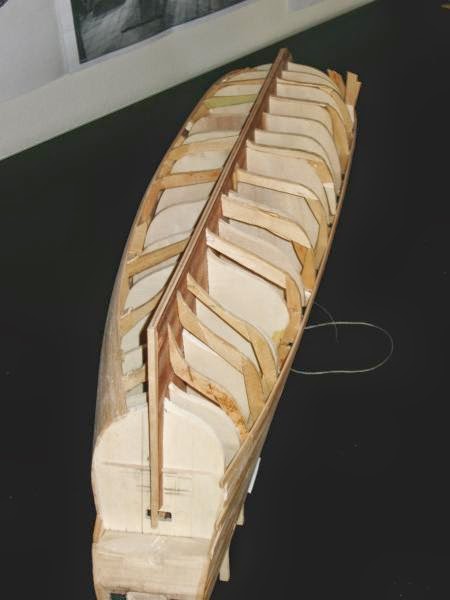
After scaling up the plans, I started checking the hull shape.
This is the worst bit, the stern, below the waterline.
Pretty bad, huh?
I built new frames using the plans. 

I used a cutout of the side view as a template for getting the deck profile right. 
The main deck had to be lowered between 5 mm and 1 cm to get it right. 
I then attached the deck.
Since the deck is curved in two directions and isn't easily pre-shaped,
I used epoxy and nails to make sure it stays firmly attached.
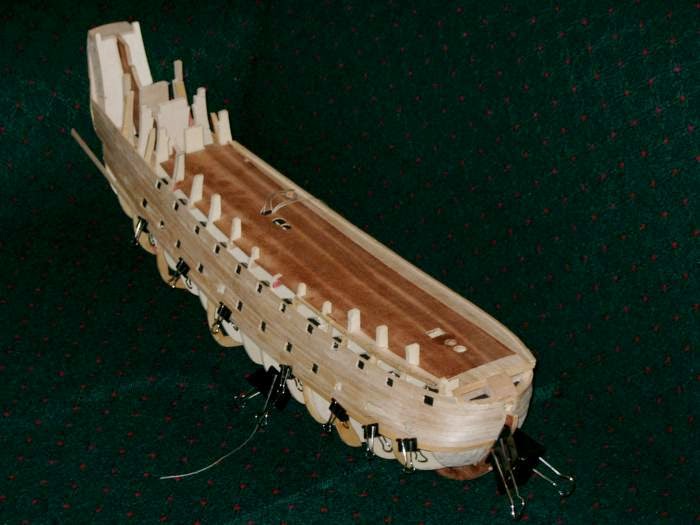
Upper gundeck ports have been marked and the half gun attachments installed behind them.
Some of the bulkheads had to be cut through since the kit had all the gunports in the wrong places.

The deck needed extension forward and the main mast needed moving forward as well.
I've adjusted the width of the deck and installed waterboards, which ended up outside the kit bulkheads!
(A scale playdough man is standing in front of the beakhead bulkhead)

The bulkhead extensions above deck seemed to be more of a nuisance than a help, so when I installed the port side
waterways I cut them off first.

A newly steamed plank is held in place while drying.
Wet planks make these clamps stain the wood, caution!

It doesn't matter here though. This is only the first layer of planking. 

These pictures are pretty telling in how inaccurate the kit hull shape is.


Thursday, September 27, 2012

Initial framing

First thing was to set up the framing.
Initially, I used the framing from the kit.
(It's still in there somewhere, but the shape of the hull turned out quite modified..)

The fit was not perfect, but good enough. From a flat box to the shape of a ship in less than an hour.
Quite a fun part of the build.
Now, the stern looked completely ridiculous, so I ordered the official plans from the Vasa museum in Stockholm. A couple of adjustments might be in order?
In the meantime, I traced the stern on a piece of paper and tried to adjust it to match photos I could find in books.
The one on the right is the kit frame. Pretty bad. 
No symmetry. 
And why does it go wider at the top!
-Honestly, this is a true trace from the kit part! Even though it looks like it was drawn by a three year old..

Some padding required to shape it up!

The stern after a bit of adjusting.
Also, the kit has a flat stern. Should be curved, so I'm padding it a bit.
-At this point, the museum plans arrived with a bit of a shock as to how far from accurate the Corel frames were..

Monday, September 24, 2012

Quick description of my Vasa build project

This build started out as a build of the Corel kit, but quickly changed into pretty much a scratch build using the Corel materials..


This is the contents of the Corel Vasa kit..